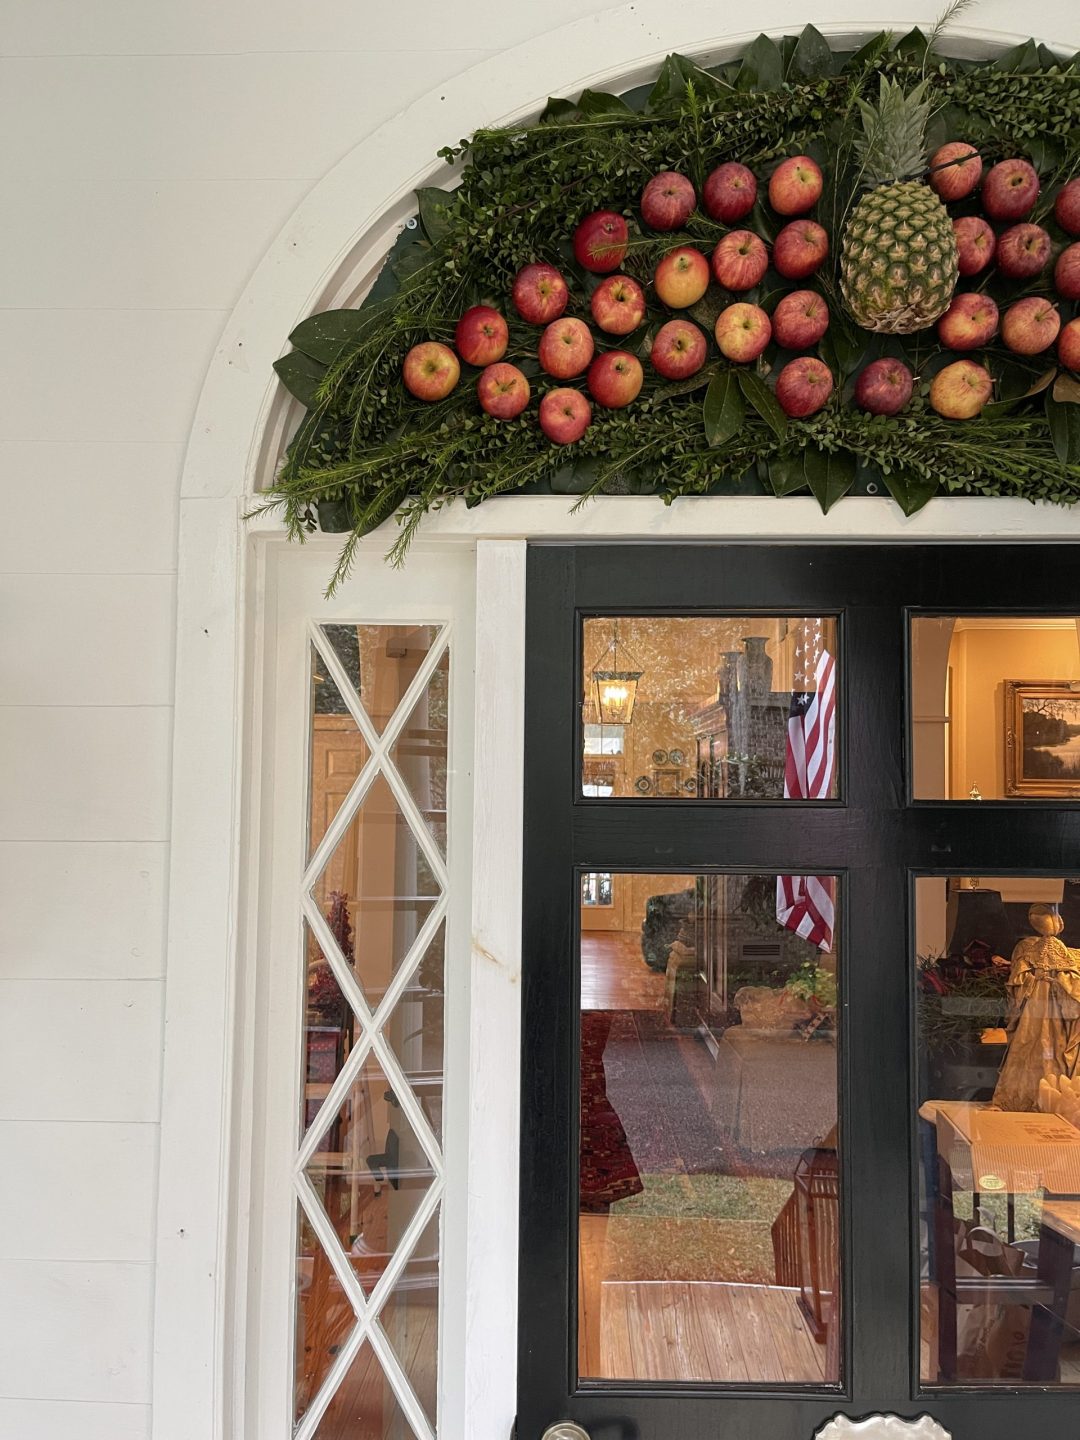
Creating a Colonial Williamsburg-Inspired Apple Fan
Year after year, the festive spirit takes residence at my neighbor’s doorstep, where they masterfully craft and hang a captivating fruit arrangement called an Apple Fan. This time around, fueled by a determination to immerse myself in the artistry of holiday decor, I eagerly offered my assistance, keen to glean the secrets of their annual tradition. Together, we embarked on the creation of a breathtaking display that seamlessly blends nature’s bounty: magnolia leaves, fresh apples, fragrant boxwood, resilient cedar, and the unexpected yet delightful addition of a pineapple. The result is nothing short of a showstopper—an arrangement that not only captures the attention of passersby but also serves as a testament to the enduring inspiration drawn from the historic holiday decorations of Colonial Williamsburg. In every carefully chosen element, there’s a nod to tradition and a celebration of the timeless beauty that defines this festive season.
Eager to share the enchantment of our Colonial Williamsburg-inspired festive Apple Fan arrangement, I’ve put together a quick tutorial to guide you through the steps of recreating this timeless piece for your own home. The magic lies in the combination of natural elements, so let’s dive in and craft a showstopping display that mirrors the grace and elegance of a bygone era.
Embarking on the creation of your Colonial Williamsburg-inspired festive fruit arrangement is not just a delightful crafting endeavor but also a nod to the rich traditions encapsulated in the book, “Colonial Williamsburg Decorates for Christmas.” Drawing inspiration from this literary treasure, we delve deeper into the timeless artistry and historical significance that underpin the decorations adorning the pages of this holiday classic.
Materials:
- 1 piece of 1/2″ thick plywood cut into a fan shape to fit the top of the door frame.
- Hammer
- 30 Eightpenny finishing nails
- 1 Fourpenny box nail
- 1 piece of #22 gauge floral wire, 12″ in length
- 3 screw hooks
- 3 screw eyes
- Staple gun & staples
- Roughly 22 large magnolia leaves
- Clippers
- 80 3″ sprigs of boxwood & cedar
- 30 large red Delicious apples
- 1 medium to large pineapple
- 3 pieces of #16 gauge floral wire in 6″ lengths
Begin at the lower right corner of the frame 2 1/2″ from the outer edge. Drive a row of 7 eightpenny finishing nails into the board approximately 3 inches apart along the outer curve and ending just to the right of the center.
The row of nails should slant upward 1 3/4″from the board. The center space will be filled by the pineapple. Leave 4 inches between the rows of the nails. Drive in another row of 5 upward slanting nails 3 inches apart. Drive in the last row of 3 upward slanting nails 3 inches apart. Repeat on the left side of the frame. Drive the 3 tenpenny nails into the center of the frame in a triangle. Drive the fourpenny nails into the frame above the triangle 3 1/2 inches from the top center edge. Twist the piece of #22 gauge floral wire around the nail. It will be used to secure the pineapple top.
Attach a screw hook on the back of the board at the center top 2 inches from the edge. Attach a screw hook at each corner 2 inches in from the edges. Attach corresponding screw eyes on the building.
Cut the stem ends off of the magnolia leaves. Staple the magnolia leaves to the top curve of the board in a fan shape so that the leaves protrude outward 3-4 inches from the edge of the board. Staples the sprigs of boxwood onto the board so that it covers the stem ends of the magnolia leaves.
Impale an apple on each nail. The stem end should face outward. Impale the pineapple on the 3 nails in the center of the board. Wrap the wire through the leaves of the pineapple to secure it. Twist the wire several times in back of the pineapple foliage.
To secure the board to the home, hook screw hooks through the screw eyes. Wrap a piece of #16 gauge floral wire around each hook and eye. (We actually attached the fan to the home using screws and a power screwdriver).

No Comments